It's Halloween week, and we can't celebrate Halloween without a haunted house.
Here is a pop-up card I made using the new Cricut Artfully Sent cartridge.
I cut the images out of p. 44.
The grey liner is cut at 7 3/4" using the "Pop-up" "Shift" keys. I stuck a piece of Canary yellow behind the moon before sticking it down to a colonial base cut out at 8" using the "Pop-up" key.
The haunted house is cut at 3" using the "Icon" key. Glued scraps of canary behind the windows.
The spooky tree is cut at 2 3/4" using the "Icon" and "Shift" keys.
Supplies
Cardstock: Whisper, Black, Canary
Stamp set: August 2014 SOTM
Ink: Thistle
Thanks for visiting. I love getting your comments and feedback. Be sure to leave a comment below.
à bientôt,
Dominique
Tuesday, 28 October 2014
Monday, 27 October 2014
Halloween bag toppers - You've been ghosted !
Do you know this tradition? Some places call it "boo-ing", others call it "ghosting" or being "ghosted".
The idea is the week before Halloween, you make up a bag of candy/treats, kids go over to a friend's or neighbour's house, secretly leave the bag behind from the "Phantom Ghost", ring the bell and run! It's a cute little game and the kids love it.
See below for the full poem.
I saw the Challenge Me Monday... Challenge #234 Halloween Projects so I made these bag toppers for the bags of candy.
Both toppers were cut using the Cricut Art Philosophy cartridge, on p.25. The "card" image was cut out at 4 1/2" real dial size, and scored into two.
On the left
Before scoring, run the piece of purple Gypsy through the BigKick using the CTMH woodgrain embossing folder for texture. Stamp the pumpkin image from the August of SOTM onto a Daisy White cardstock circle, distress in thistle ink and stick it to a scalloped circle in Sunset orange cardstock.
On the right
The topper on the right was made using the Scaredy Cat paper. The label was cut from the Cricut Artiste cartridge on p.33 at 1". The stamp set used is the super versatile Holiday Tags. The label was stamped in Gypsy purple and the sentiment in Slate grey ink.
When the toppers were ready - We slid pipe cleaners inside and created a loop so they could hang off doorknobs. We stapled the topper to the bag of halloween candy and to the poem.
Here is the poem in case you want to make your own
à bientôt,
Dominique
The idea is the week before Halloween, you make up a bag of candy/treats, kids go over to a friend's or neighbour's house, secretly leave the bag behind from the "Phantom Ghost", ring the bell and run! It's a cute little game and the kids love it.
See below for the full poem.
I saw the Challenge Me Monday... Challenge #234 Halloween Projects so I made these bag toppers for the bags of candy.
Both toppers were cut using the Cricut Art Philosophy cartridge, on p.25. The "card" image was cut out at 4 1/2" real dial size, and scored into two.
 |
| Bag toppers |
On the left
Before scoring, run the piece of purple Gypsy through the BigKick using the CTMH woodgrain embossing folder for texture. Stamp the pumpkin image from the August of SOTM onto a Daisy White cardstock circle, distress in thistle ink and stick it to a scalloped circle in Sunset orange cardstock.
On the right
The topper on the right was made using the Scaredy Cat paper. The label was cut from the Cricut Artiste cartridge on p.33 at 1". The stamp set used is the super versatile Holiday Tags. The label was stamped in Gypsy purple and the sentiment in Slate grey ink.
When the toppers were ready - We slid pipe cleaners inside and created a loop so they could hang off doorknobs. We stapled the topper to the bag of halloween candy and to the poem.
Here is the poem in case you want to make your own
BOO !
YOU HAVE BEEN
GHOSTED !
The Phantom Ghost has come to town
To leave some goodies… I see you’ve found.
If you wish to make this a happier fall…
Continue this greeting, this phantom call.
First, post
this Ghost where it can be seen,
And leave it there until Halloween.
This will scare other Phantoms who may visit,
Be sure to participate, you don’t want to miss it !
Second, fill
2 bags with candy and treats.
And make 2 copies of this GHOSTING sheet.
Deliver them to two
neighbours, try to stay calm.
Don’t let them see you, be sneaky no doubt…
And make sure they put their Phantom Ghost out !!
Next you have only one day to act, so be quick !
Leave
it at doors where the Phantom hasn’t hit.
Deliver at a time when no one is home…
Stay out of sight… for it adds to the fun.
And last, but not least, come join in the season.
Don’t worry, be happy, you need no good reason.
This is all in good fun and we are just trying to
say…
HAPPY HALLOWEEN
& HAVE A GREAT DAY !!
Dominique
Sunday, 26 October 2014
Color Dare #116 - Thistle and Sunset
This week at Color My Heart Challenge Blog, the Color Dare #116 is Thistle and Sunset - two of the colours featured in the Scaredy Cat paper pack.
à bientôt,
Dominique
I was invited over to give a Halloween-themed workshop on the weekend and was asked to make it "cheerful". That was a challenge - but these colours and the Scaredy Cat paper is perfect for that!
For the front
I stamped the pumpkin stamp from the August of SOTM onto a Colonial paper circle, distressed in thistle ink and put on a scalloped circle in Sunset. Underneath, I put the zip strip with bats from the Scaredy Cat paper across. I then matted a rectangular piece of Scaredy Cat paper onto Thistle.
à bientôt,
Dominique
Friday, 24 October 2014
Everything ABC's Blog Hop - letter V
Welcome to the Everything ABC's Blog Hop!
For this hop we are featuring the letter V. This may be the name of a paper, a stamp set, an embellishment or a style. Whatever the crafter has chosen as their V element will be featured in their post.
If you came from Catherine Nowak at Catscrapbooking then you're on the right track!
__________________________________________________
I confess that the letter V is not an easy letter to use for inspiration. I came up with VINTAGE.
So I took this vintage clock stamp set available for purchase by hostesses, and used a VARIETY of brown tones to give a sepia feel - just like in old photos. I used colonial, cashmere, champagne and chocolate cardstocks. But then I added some gears and a face to the clock and made an easel card for something different.
 |
| Easel Card |
And here is what the card looks like open
 |
| Inside |
Colonial White: 10 1/2" x 4 1/4", score at 5 1/4" and at 7.7/8"
Yuletide patterned paper: 2 5/8" x 4 1/4"
Bronze shimmer tape: 4 1/4"
Cricut Artiste: Gears cut out of Cashmere
Sentiments stamped in chocolate
In fact I made a set of these cards as part of a swap with other local CTMH consultants.
 |
| Swap-ready |
To make the front
Chocolate mat 5 1/4" x 4 1/4"
Colonial 5"x 4", embossed with quaterfoil folder
Cricut Artiste: Clock base, clock face, clock hands and gear
Stamp mustache and eyeglasses
Bronze shimmer trim at edge 5 1/4"
TIP
Swipe you ink pad across the embossing folder before running it through the machine for added dimension.
Use liquid glass in the spectacles, it will dry clear gloss - helps makes it look more realistic.
 |
| Side view |
TIP
Pop up the gears to give the card front something to rest on.
Thanks for visiting. I love getting your comments and feedback. Be sure to leave a comment below before you move on in the hop!
Your next stop on our Everything ABC'S blog Hop is Lauren Moore of CTMH Craftings. In case you get lost along the way, go to Linda's blog ~ Scrappy Therapy for a complete list of participants!
And don't forget
Friends don't let friends craft alone.
à bientôt,
Dominique
Thursday, 16 October 2014
Halloween Witch's Hat - spiderweb
And for the 3rd day in a row - I am posting the CTMH tutorial on how to make a witch's hat. This is another variation using the cone and base shapes, by simply changing the paper and using different accessories and embellishments. To find the complete list of materials required, you can see them here in the Annual Inspirations recipes.
Spiderweb-Topped Hat
 |
Cricut® Shapes
Artiste
Circle: 7 ½" Card (p. 48)
Sunburst: 9" Accent 3 <5> (p. 35)
Yo-Yo: 1 ¼" Shift+Card (p. 55)
Decorative Circle: 2" and 3 ¼" Accent 4 <5> (p. 35)
Spike Flowers: 1 ¾" and 2" Shift+Accent 2 (p. 54)
Artbooking
Corner Spiderwebs: 3 ½" RDS Shift+Overlay (cut 2, p. 70)
- This hat’s base is made from a sunburst shape from the Cricut® Artiste cartridge.
- The spiderweb topper is made from two webs cut from the Cricut®Artbooking cartridge. Adhere their edges together and trim hat as necessary.
- The spider image is from the Scaredy Cat Complements.
- The focal point of this hat is made from a stamped image from the Halloween Greetings stamp set.
- The pleated strip of B&T at the base of the cone was stitched before being adhered to the cone.
Batty Hat
Cricut® Shapes:
Artiste
Yo-Yo: 1 ½" Shift+Card (p. 50)
To find a list of the other materials required, please refer to the Annual Inspirations recipes.
And don't forget
Decorative Circle: 4" Accent 4 <5> (p. 35)
Circle: 9 ½" Card (p. 48)
Cupcake Liners: 2" Accent 4 (cut 4, p. 77)
Spike Flowers: 1 ¾" and 3" Shift+Accent 2 (p. 54)
Round Flowers: 3 ¼" and 3 ½" Accent 2 (p. 54)
To find a list of the other materials required, please refer to the Annual Inspirations recipes.
- The streamers dangling from this hat are made from a variety of Scaredy Cat B&T papers that have been folded accordion-style and attached at the top.
- This hat’s focal point is an image cut from a sheet of Scaredy Cat B&T. The bat images are Scaredy Cat Complements.
Friends don't let friends craft alone.
à bientôt,
Dominique
Wednesday, 15 October 2014
Halloween Witch's Hat - Bats
And for day the second day in a row - here is another variation of the witch's hat using the same cone and base shapes, just different accessories and embellishments. Below I have pasted the tutorial from the CTMH blog. You can see the complete list of materials required here, in the the Annual Inspirations recipes.
Batty Hat
Cricut® Shapes:
Artiste
Yo-Yo: 1 ½" Shift+Card (p. 50)
To find a list of the other materials required, please refer to the Annual Inspirations recipes.
Decorative Circle: 4" Accent 4 <5> (p. 35)
Circle: 9 ½" Card (p. 48)
Cupcake Liners: 2" Accent 4 (cut 4, p. 77)
Spike Flowers: 1 ¾" and 3" Shift+Accent 2 (p. 54)
Round Flowers: 3 ¼" and 3 ½" Accent 2 (p. 54)
To find a list of the other materials required, please refer to the Annual Inspirations recipes.
- The streamers dangling from this hat are made from a variety of Scaredy Cat B&T papers that have been folded accordion-style and attached at the top.
- This hat’s focal point is an image cut from a sheet of Scaredy Cat B&T. The bat images are Scaredy Cat Complements.
à bientôt,
Dominique
Tuesday, 14 October 2014
Halloween Witch's Hat
October 31 Hat
Well several CTMH clients have asked for instructions on how to recreate them and you can find step-by-step directions on Jeannette Lynton's blog. but I copied them here for you. You can use the Annual Inspirations recipes to find a list of the other materials required, but here is the list of Cricut® Shapes:
Artiste cartridge
Spike Flowers: 3 ½" and 4 ½" Shift+Accent 2 (p. 54)
Round Flowers: 3 ½" and 2 ¾" Accent 2 (cut several, p. 54)
Cupcake Liners: 2 ½" and 2" Accent 4 (cut 4 of each, p. 77)
Circle: 11" Card (p. 48)
Vines: 1", 1 ½”, and 1 ¾" Shift+3D Object (cut several, p. 54)
Spiderweb: 4 ½" Accent 4 (p. 76)
Banners: 1 ¼" and 2" Accent 2 <5> (cut several, p. 35)
Cone and Base
1. Attach two sheets of 12" x 12" B&T paper on top of two sheets of 12" x 12" cardstock. This double-sheet thickness is needed for extra stability in the cone of the hat.
2. Using tape, attach the two sheets of layered 12" x 12" papers together to form a 24" length. Ensure that edges are precisely aligned.
3. Starting from one corner, roll the paper into a cone, adjusting to form your desired shape. Use a strong adhesive to hold it in place. Hats will measure differently according to how tight you roll your cone.
5. Center the cone on the base and trace the bottom of cone onto circle shape. Trace another circle within the first, about a 1/2" smaller than the original.
6. Trim out innermost center circle, then use scissors to cut ½" slits approximately 1" apart around the entire outer circle to create tabs. Fold tabs upward.
7. Staple, or adhere with a strong adhesive, the tabs into the cone, starting from where you would like the front of your hat to be.
Edging
1. Cut out spiderweb cupcake liners and trim off the tabs.
2. Attach four of the 2 ½" spiderweb liners underneath the base of circle so that the edges of the webs extend beyond the rim of the hat.
3. Attach the 2" spiderweb liners along the top of the hat’s brim against the inner edges, near the cone.
Decoration
1. Select where you would like the front of your hat to be and adhere the 2" banner to it.
2. Adhere 1 ¼" banners overlapping the larger banner around the bottom of the cone.
3. Cut several ½" strips of B&T paper, pleat them, and attach them end to end on the bottom of the cone.
4. Cut out flowers, spiderweb, and vines from the Cricut® Artiste cartridge.
5. Use an embossing tool to mold the leaves of the branch shapes. Ink the edges with Slate ink using the sponge dauber.
6. Ink the edges of the flowers in Thistle and Sunset using the sponge dauber. Using your quilling tool, roll the flowers, adhere them closed, and add Sparkles to the center of each as desired.
7. Attach the spiderweb to the side of the cone and layer the floral arrangement on top of it.
8. Back the “Spooky” metal shape from your Scaredy Cat Complements with Thistle cardstock and add it to the floral arrangement.
Top of Hat
1. Cut a 2" x 12" strip of Thistle cardstock. Cut a 1" notch every ¼".
2. Using your quilling tool, roll the strip until the solid edge is small enough to fit into the hole at the top of the cone. Adhere it so it cannot unroll. Make sure the roll is small enough to fit into the top of the cone. If needed, trim the tip of the hat to allow more space for the topper.
3. Fit the curled hat topper into the hole at the top of the hat and secure with adhesive.
4. Using your quilling tool, roll the ¼" strips downward into tight curls.
5. Cut the ribbon into 3" pieces, loop them, and adhere them individually to the top of the hat, arranging them in layers.
6. Add stars from the Scaredy Cat Assortment.
Embellishment
Embellish your hat with the Scaredy Cat Assortment, sequins from the Mini-Medley Accents black collection, Slate diagonal striped ribbon, or other accents of your choice.

Friends don't let friends craft alone.
à bientôt,
Dominique
Monday, 13 October 2014
Scary or Sweet, Trick or Treat
Halloween is around the corner.
Here is a cute little image from Close to My Heart that you can print up to decorate your home this Halloween season.

Simply click here. The link will take you to a PDF file that can be easily downloaded or printed from your computer. Happy Halloween!
à bientôt,
Dominique
Here is a cute little image from Close to My Heart that you can print up to decorate your home this Halloween season.

Simply click here. The link will take you to a PDF file that can be easily downloaded or printed from your computer. Happy Halloween!
à bientôt,
Dominique
Saturday, 11 October 2014
Cut Above and Designer Creations
CTMH launched two new lines in their Annual Inspirations 2014; the Cut Above and the Designer Creations.
Cut Above
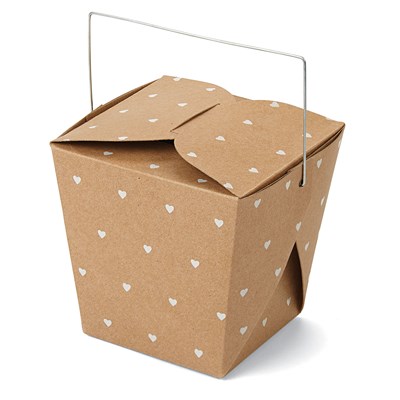
The kraft paper takeout boxes with metal wire handle folds into a cute gift box. Comes in pack of 2. It is 4" tall and tapers from 4" square top to 3" square bottom.
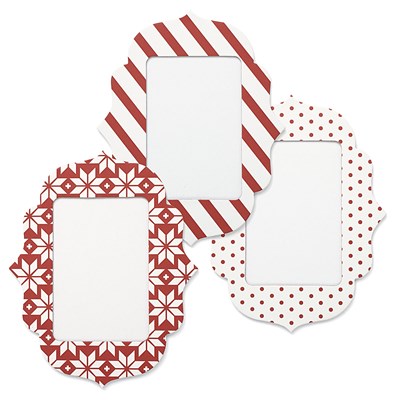
The 5" × 4" mini chipboard frames come in pack of 3, Ruby. Fit 2" × 3" photos.
The paper bags come in several different designs and 4 colours, Lagoon, Honey, Ruby and Slate.
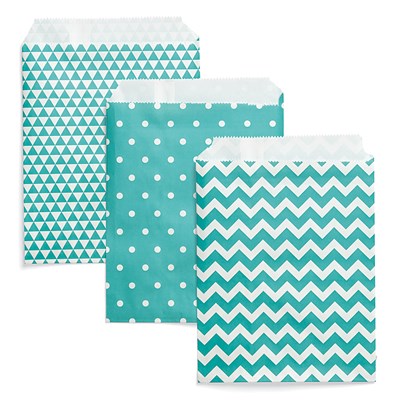
Cut Above
this line carries card and treat bag kits for quick crafting. All pieces of the kit are pre-cut and ready to be assembled. Coordinating stamp images designed especially for these kits fit perfectly on the die-cut pieces and can be stamped in a single color of ink.
The treat bag kits come in 2 themes, Halloween and Christmas and contain printed treat bags, stickers, pre-cut cardstock circles, 3-D foam squares, and cellophane bags
The card kits come in 4 themes (birthday, thank you and Christmas) and contain various mixes of card bases, envelopes, 3-D foam squares, die-cut shapes, stickers, printed pieces, and embellishments.
Designer Creations This line carries 3-D items in fun colors and patterns such as boxes and bags meant to hold your handmade art, photos, or other treats.
The buttoned bag can be fastened shut, making storage convenient.Comes in pack of 2. The slate bags are 7" × 4½" with foldable top.
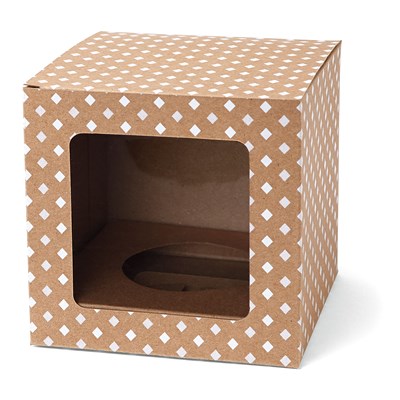
The cupcake box includes a round base—just the right size for a cupcake—and a viewing window. Comes in pack of 2.
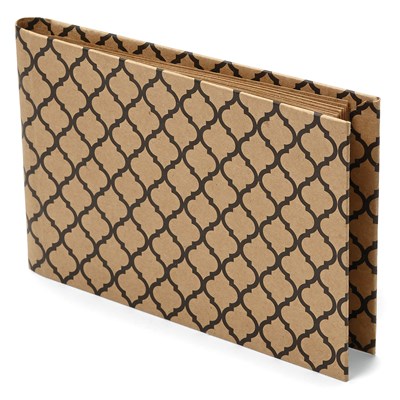
The 5" × 7" album are ideal for holding photos and other paper pieces and embellishments. Contains 10 kraft pages; kraft printed hardcover and is wire-bound.The 5" × 4" mini chipboard frames come in pack of 3, Ruby. Fit 2" × 3" photos.
The paper bags come in several different designs and 4 colours, Lagoon, Honey, Ruby and Slate.

Subscribe to:
Comments (Atom)


