Monday, 16 November 2015

Organization Time - Day Planner

Staying organized has never been easier.
Time to get rid of all those Post-it notes lying around. CTMH is introducing a new product line called the Everyday Life™ planner system with all sorts of products to help you stay organized.


The product line includes:
  • * The Everyday Life album ($13.25 CAD) is a beautiful, hard-cover 3-ring binder with black cover and gold foil design. It measures 9 3/8” x 8 ¼” x 1 ½". This size makes the album multi-purpose, allowing you to decide what you put in it. It’s not just to write in reminders and appointments, it can also be used to save memories and scrapbook pictures.
  • * Calendar/agenda planner pages for 2016 ($18.95 CAD): the 154 planner pages that you can put inside measure 8 3/8″ x 6 7/8″. There are 12 monthly dividers with tabs, 1 pocket folder page, 1 designed page finder, and 4 sheets of stickers. The pages are 3-ring hole punched and measure 8 3/8” x 6 7/8.” The pages include both monthly and weekly spreads that begin January 2016 and run through December 2016, printed dates help you focus in on the daily details and remember your plans for the entire month. The four sheets of colorful label stickers and a bookmark-style page finder to help you turn quickly to the current day. The pocket folder page helps you store receipts, fliers, and more. 
  • * Roller stamp ($10.50 CAD): This roller stamp features titles, reminders, and additional images and has phrases like “shopping list,” “no school,” and “don’t forget.” Designed to coordinate with the label stickers; simply place the label sticker in your planner, and then stamp the phrase of your choice onto it. 
* From December 1 to 31 there is a special discounted bundle for purchasing the album, planner pages and roller stamp together for just $35.95 CAD — a 15% discount off the retail value!

As of January 1, 2016, the following coordinating items will be available from the new Seasonal Expressions catalogue.
  • Pages ($9.50 CAD): A set of 60 double-sided, gorgeous My Crush pages. These pages can be combined with the planner pages to give you more room in your planner for preserving your memories. Or use them on their own to create a beautiful My Crush  mini scrapbook. 
  • Washi tape ($4.50 CAD): good for attaching photos and other memorabilia to your pages. 
  • Memory Protectors ($7.95 CAD): two new styles sized to fit into the album. One will have two 4” x 6” pockets, the other four 4” x 3” pockets. Use these to add your favorite Picture My Life™ cards and photos into the mix! 
Together, the Everyday Life line gives you ultimate flexibility in creating a planner/My Crush book/pocket album uniquely customized to you.

You are going to love this new product line. Watch this great VIDEO HERE. Contact me to order yours.


And don't forget
Friends don't let friends craft alone.

à bientôt,
Dominique

Friday, 6 November 2015

Make It Crafty Hop - Christmas Creations


Welcome to the •MAKE•IT •Crafty• Seasonal Blog Hop! This month we will be featuring Christmas creations.

If you’ve arrived from the talented Wendy's blog Doddsydesigns you are on the right path! The blog hop is a great big circle, so you can start here and work your way around. If you get lost, don't worry, you’ll find the complete list of participating consultants on Julie's blog.

It’s easy to hop along with us – just click the link at the end of each blog post to move to the next one. Just a gentle reminder to please leave comments for the other bloggers as you hop through!

In this hop, Ottawa Close To My Heart Consultants share their creations using various CTMH products from either the Annual Inspirations catalogue or Holiday Seasonal one.  These should help you get in the mood for the holidays.
***********************
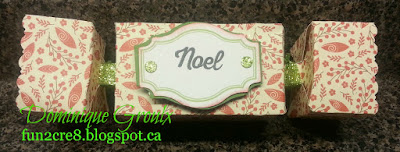
Nothing puts me in a festive mood like decorating. So here is an easy way to dress up your holiday table - Christmas crackers.

Such a great family tradition - ask the person sitting beside you to grasp their end and pull to tear the cracker apart, and POP -  out come the goodies.

Christmas cracker

This cracker was made using paper from the White Pines paper pack (X7200B).  I tied the ends of this  one with green shimmer trim (Z3087). It is a perfect match for pear green - I used the pear cardstock to mat the tag and the 2 glitter circles come from Fundamental Assortment (Z3100).

INSTRUCTIONS
1. From the the Artiste Cricut cartridge, cut the cracker (the one above was cut at 8")
2. If you use plain cardstock - Decorate the sides using stamps, washi, glitter. (see examples below)

3. Score all the fold-lines.

4. Form the cracker shape by taping the centre box. Then push the small bow-tie-shaped ends in towards the box, forming the ends "ruffles".  (Like on right side)

5. Slip in snaps inside the cracker with ends sticking out. Glue to inside of "ruffles" so that they pull apart when the cracker is pulled. (I purchased cracker snaps from the big box craftstore.)
6. Insert little items - tissue-paper crowns, a riddle or joke, candy, and a little toy or other small gift. (Purchased at the dollar store) 

7. Tie the ends together with ribbon. Any ribbon will do. (here i used shimmer trim, see below where plain gift wrapping ribbon was used.)

8. Add a tag with a holiday wish.

Last year we used crackers instead of place cards. Simply personalize each cracker according to each person's interests. Elegant snowflakes for Mamie, sweets for Grandpa, santa for Mom and trees for Dad, ornaments for the kids.


*********
Thank you so much for following along on our Blog Hop today! I hope you enjoyed all the lovely artwork. Now it’s time to head on over to Pam's blog and see her project! Be sure to visit all the Consultants at their Blogs to get some great crafting ideas!

And don't forget
Friends don't let friends craft alone.

à bientôt,
Dominique

Monday, 26 October 2015

14 hour Christmas Crop - Saturday November 21

Come crop til you drop from 9:30AM to 11:30PM ! This bilingual event is open to all crafters! 

Day Includes la Journée Inclus
• 8 feet of cropping space / 8 pieds d'espace de travail
• Free Goodie Bag / sac-cadeau gratuit
• 14 hours to focus on your crafting / 14 heures de crop 
• Challenge, Games and Prizes. (must be present to win) / Défijeux et des prix 
• Shopping (scrapbooking supplies available). / Magasinage (des fournitures seront disponible) 
• Free Wi-Fi / WiFi gratuit
• Free parking and easy access - no stairs. / Sationnement gratuit et facile d'accès - aucun escalier
• Fun and laughter / du plaisir autant que vous en voulez!!!

Optional / Supplémentaire
• Meals/ Repas:

            Lunch: Salad, pop, pizza / salade, boisson, pizza (1 slice/pointe= $5 or/ou 2 slices/pointes= $9)
            Dinner $10 (salad, roll, chili with toppings, dessert) / Souper 10 $(salade, petit pain, chili et                     accompagnements, dessert)
• Christmas-themed  Workshops / Ateliers à thématique de Noël:  
           Cards:  $12  Make a set of 10 cards in less than 60min (envelopes included).  Faites un                                        ensemble de 10 cartes en une heure (enveloppes inclus)
           Scrapbooking: A double and a single layouts $15 (or $20: keep a full set of embellishments)
                         Sneak peek below. / Double pages de scrap et une simple pour 15 $ (ou 20 $ sans                                partager les embellissements)

PRICING / COÛT
$35 + meals + workshops / 35 $ + repas + ateliers

PAYMENT OPTIONS / PAIEMENT
• E-transfer payment / transfert bancaire
• Cash / comptant

TABLES
Get a full 8-foot table all to yourself. Lots of Room!! Dedicated tables will be set up near power outlets for Cricut/Silhouettes, etc. 
Une table de 8 pieds par croppineuse. Des tables seront installées près des prises de courant pour les appareils Cricut/Silhouettes. 

MEALS / REPAS
 Pizza served at lunch will be from famous Louis restaurant. Dinner will be salad, roll, chili with toppings, dessert. Bar will open at noon. We do not have access to a fridge, microwave or kitchen. /
Les pointes de pizza pour le lunch proviennent de chez Louis.  Souper (salade, petit pain, chili et accompagnements, dessert) Le bar sera ouvert à midi. Il n’y a pas de cuisine, ni frigo ou micro-ondes. 
WORKSHOPS / ATELIERS
Sign up for one or both. Card workshop taught by Dominique Groulx and layouts taught by Sue Mallory.
Prenez-en un, ou tous les deux. L'ateliers de cartes offert par Dominique Groulx et les pages de scrapbooking par Sue Mallory. 

REGISTER by November 1/ INSCRIPTION d’ici le 1er novembre 2015
Cost is $35 + meals + workshops. Return the registration form with your payment to guarantee your spot. Space is limited. Sorry, no refundshowever your spot can be transferred to a friend - just let us know. 
Coût: 35 $ + repas + ateliers. Veuillez retourner le formulaire d’inscription avec votre paiement le plus tôt possible afin de réservez votre place. Désolé, aucun remboursement ne sera accordé, par contre, votre place peut être transférée à une autre – dites-nous le dès que possible.  

FOR MORE INFORMATION / POUR PLUS D'INFO
Contact me at dominique.fun2cre8@gmail.com


And don't forget
Friends don't let friends craft alone.

à bientôt,
Dominique

Friday, 2 October 2015

Make It Crafty October

Welcome to the •MAKE•IT •Crafty• Seasonal Blog Hop! This month we will be featuring Halloween and Fall creations.

If you’ve arrived from the talented Julie's blog the Scrapzone, you are on the right path! The blog hop is a great big circle, so you can start here and work your way around. If you get lost, don't worry, you’ll find the complete list of participating consultants on Julie's blog.

It’s easy to hop along with us – just click the link at the end of each blog post to move to the next one. Just a gentle reminder to please leave comments for the other bloggers as you hop through! Enjoy.

In this hop we have 10 Close To My Heart Consultants sharing their creations using various CTMH products from either the Annual Inspirations catalogue or Holiday Seasonal one.  These should help you get in the mood for Fall.

*********
looove decorating for Halloween, so I created spooky pop up box cards. It's a card that stands up on its own, so you can use is as decor.


Halloween pop up box card
Halloween pop up cards

Instructions
To make a pop up box card, cut a sheet of pattern paper or cardstock at 11.5" by 5.5" and cut a 1" strip into 2 pieces 4.75" long to be used as stabilizers.

To make the sides of the box take the big piece and score at 2.75", 5.50", 8".25 and 11".  
To make the flaps, rotate the paper 90 degrees and score at 2.5" and fold down 3 of the sides. I corner rounded the edges.
Keeping one 1 side long and tall. This is the back.

To stabilize the box, take the 2 stabilizer pieces and score them at 1" from each end and
fold them into Z shape and glue them to the sides of the box. It looks like this.


Now comes time to decorate.

Haunted House Halloween pop up box card
Haunted House pop up card

For the card with the haunted house, I used a sheet of Nevermore (X7198) paper. All the Halloween images were cut from the Artbooking Cricut cartridge (Z3169).   For the front flap, I used some black shimmer trim and the word "Spooky" in Thistle cardstock (X5769). For the 2 slide flaps, I cut the zip strip and mat it on whisper cardstock (X5929) and popped up. The iron fence and the haunted house are glued to the stabilizers.

I also decorated the bottom with a bit of purple sparkly shimmer trim (Z1919) for when the card is closed.
Closed card


For the black card, I cut up the new see through PML (Z3175) and used them to support the ghosts so they look like they are floating in the air. The ghosts were cut using the Artistry cartridge (Z3167).

Halloween Ghost pop up box card
Halloween Ghost pop up card

*********
Thank you so much for following along on our Blog Hop today! I hope you enjoyed all the lovely artwork. Now it’s time to head on over to Diana's blog and see her gorgeous artwork! Be sure to visit all the Consultants at their Blogs to get some great crafting ideas! Look for our next Blog Hop where we will feature beautiful projects for the Holidays, see you soon!

And don't forget
Friends don't let friends craft alone.

à bientôt,
Dominique