Welcome to the •MAKE•IT •Crafty• Seasonal Blog Hop! This month we will be featuring Christmas creations.
If you’ve arrived from the talented Wendy's blog Doddsydesigns you are on the right path! The blog hop is a great big circle, so you can start here and work your way around. If you get lost, don't worry, you’ll find the complete list of participating consultants on Julie's blog.
It’s easy to hop along with us – just click the link at the end of each blog post to move to the next one. Just a gentle reminder to please leave comments for the other bloggers as you hop through!
In this hop, Ottawa Close To My Heart Consultants share their creations using various CTMH products from either the Annual Inspirations catalogue or Holiday Seasonal one. These should help you get in the mood for the holidays.
***********************
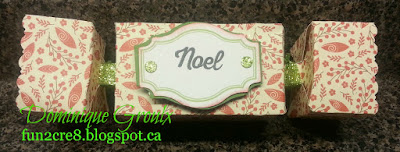
Nothing puts me in a festive mood like decorating. So here is an easy way to dress up your holiday table - Christmas crackers.Such a great family tradition - ask the person sitting beside you to grasp their end and pull to tear the cracker apart, and POP - out come the goodies.
 |
INSTRUCTIONS
1. From the the Artiste Cricut cartridge, cut the cracker (the one above was cut at 8")
3. Score all the fold-lines.
4. Form the cracker shape by taping the centre box. Then push the small bow-tie-shaped ends in towards the box, forming the ends "ruffles". (Like on right side)
5. Slip in snaps inside the cracker with ends sticking out. Glue to inside of "ruffles" so that they pull apart when the cracker is pulled. (I purchased cracker snaps from the big box craftstore.)
6. Insert little items - tissue-paper crowns, a riddle or joke, candy, and a little toy or other small gift. (Purchased at the dollar store)
7. Tie the ends together with ribbon. Any ribbon will do. (here i used shimmer trim, see below where plain gift wrapping ribbon was used.)
8. Add a tag with a holiday wish.
Last year we used crackers instead of place cards. Simply personalize each cracker according to each person's interests. Elegant snowflakes for Mamie, sweets for Grandpa, santa for Mom and trees for Dad, ornaments for the kids.
*********
Thank you so much for following along on our Blog Hop today! I hope you enjoyed all the lovely artwork. Now it’s time to head on over to Pam's blog and see her project! Be sure to visit all the Consultants at their Blogs to get some great crafting ideas!
Friends don't let friends craft alone.
à bientôt,
Dominique


Christmas Crackers ~ I loved these as a kid... will have to make some for this Christmas!
ReplyDeletesuch a fun tradition
DeleteMade these with the kids last year and they loved it.
I have always wanted to make my own! This has inspired me to finally do it. Love them!!
ReplyDeleteIt's so much fun to make.
DeleteLove this idea! It would definitely add some fun to the Christmas dinner table!
ReplyDeleteGreat for all ages.
DeleteGreat idea!
ReplyDeleteThanks for looking
DeleteLove It!!
ReplyDeleteI really should make these, thanks for the detailed instructions.
ReplyDeleteLet me know if you have any questions on how to make them
Delete