If you have just hopped onto my blog, you can start here as this is a circular hop. If you came from Nicky Scott's Timeless Cottage blog in Hampton, New Brunswick then you are in the right place!
*******
Summer is HERE, and that means BBQ with friends and weekend at the cottage.
By the time you pack up the kids and load up the car, who has time to find the perfect hostess gift? Just grab a bottle of wine, slip a tag on it's neck and go.
This is a super simple project that your holiday hosts are sure to appreciate.
3. Score other end at 3" and center the circle punch from the edge to make the opening for the bottle neck. Use the corner rounder if you like.
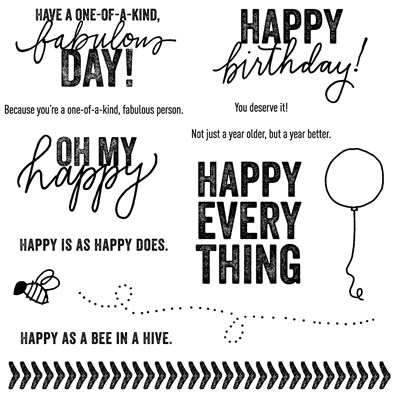
4. Stamp the sentiment from the "Happy Everything" Operation Smile set, onto a piece of Daisy white cardstock.
5. Mat the sentiment onto cardstock, adhere to the tag.
For the yellow wine tag with the bumble bee, I stamped the flight of the bumble bee directly onto the tag and then stamped the teeniest saying from the stamp set "You deserve it", and popped up the beecause on cardstock so the pun would stand out.
Supplies
Pattern Paper: Lftover in my leftover stash - Jubilee (yellow) Arrows (Dream Pop)
This stamp set is perfect for making hostess gifts. It has such a variety of fun sentiments to choose from.
 *********
By the time you pack up the kids and load up the car, who has time to find the perfect hostess gift? Just grab a bottle of wine, slip a tag on it's neck and go.
This is a super simple project that your holiday hosts are sure to appreciate.
 |
Wine Bottle Tags
|
Steps
1. Trim your paper to inches 3 x 8 inches.
2. Cut fishtail at one end if you like.1. Trim your paper to inches 3 x 8 inches.
3. Score other end at 3" and center the circle punch from the edge to make the opening for the bottle neck. Use the corner rounder if you like.
4. Stamp the sentiment from the "Happy Everything" Operation Smile set, onto a piece of Daisy white cardstock.
5. Mat the sentiment onto cardstock, adhere to the tag.
For the yellow wine tag with the bumble bee, I stamped the flight of the bumble bee directly onto the tag and then stamped the teeniest saying from the stamp set "You deserve it", and popped up the beecause on cardstock so the pun would stand out.
Supplies
Stamp: special Operation Smile set Everything Happy (D1653)
Cardstock: Daisy White (1385 ) and Smoothie (X5763)
Ink: Archival Black (44751) and Lagoon (Z2195)
Tools: Score board (Z1937), corner rounder (Z1912) and hole punch

We hope that you will take the time to leave comments on our posts, as we love to get feedback from our viewers....whether it was something that you really liked or some new technique that was used that you would like to learn how to do....by leaving us comments, we get to hear what you like, and what you want to see. Thank you…
Your next stop on the Cross Canada Hop is Krista from Oshawa's blog. If you get lost along the way, you can head to Michelle Stewart's blog, as she has the complete blog list.
Thanks for hopping along with us - we hope we were able to inspire you to get creative using some of the designs, products and techniques seen along the way.
Friends don't let friends craft alone.
à bientôt,
Dominique


So super cute, and an easy way to dress up that little "thank you for hosting gift."
ReplyDeleteSo quick and simple to do
DeleteWhat a great idea!
ReplyDeletethanks
DeleteLove these! My husband makes a lot of wine and we often give our friends a bottle or two. These are perfect for that!
ReplyDeleteLove to see what you come up with. They are so easy to make, you can customize a whole bunch.
DeleteFun! Thanks for the step by step instructions.
ReplyDeleteThanks for looking
Delete