Showing posts with label Christmas. Show all posts

Sunday, 2 October 2016

October Stamp of the month - promotion


Each month, CTMH releases a special stamp set available for that month only. You can purchase the (Stamp of the Month) SOTM for only $6 when you place an order of $50 or more in Close To My Heart products. Alternatively you may order one or more of this stamp for $23.

The October 2016 Stamp of the Month is called Yuletime Joy.   It has a 7 stamps perfect for the holdiday cards and for colouring.


Here is a layout created with the stamp set by CTMH Corporate artists.

Layout

And here is a series of cards made by my friend and fellow consultant Julie from TheScrapzone. If there is interest I can even offer the workshop to make all 5 cards.


To get your stamp you can shop on my site at www.dominique.clostemyheart.ca  or email me your order at dominique.fun2cre8@gmail.com

And don't forget
Friends don't let friends craft alone.

à bientôt,
Dominique

Friday, 6 November 2015

Make It Crafty Hop - Christmas Creations


Welcome to the •MAKE•IT •Crafty• Seasonal Blog Hop! This month we will be featuring Christmas creations.

If you’ve arrived from the talented Wendy's blog Doddsydesigns you are on the right path! The blog hop is a great big circle, so you can start here and work your way around. If you get lost, don't worry, you’ll find the complete list of participating consultants on Julie's blog.

It’s easy to hop along with us – just click the link at the end of each blog post to move to the next one. Just a gentle reminder to please leave comments for the other bloggers as you hop through!

In this hop, Ottawa Close To My Heart Consultants share their creations using various CTMH products from either the Annual Inspirations catalogue or Holiday Seasonal one.  These should help you get in the mood for the holidays.
***********************
Nothing puts me in a festive mood like decorating. So here is an easy way to dress up your holiday table - Christmas crackers.

Such a great family tradition - ask the person sitting beside you to grasp their end and pull to tear the cracker apart, and POP -  out come the goodies.

Christmas cracker

This cracker was made using paper from the White Pines paper pack (X7200B).  I tied the ends of this  one with green shimmer trim (Z3087). It is a perfect match for pear green - I used the pear cardstock to mat the tag and the 2 glitter circles come from Fundamental Assortment (Z3100).

INSTRUCTIONS
1. From the the Artiste Cricut cartridge, cut the cracker (the one above was cut at 8")
2. If you use plain cardstock - Decorate the sides using stamps, washi, glitter. (see examples below)

3. Score all the fold-lines.

4. Form the cracker shape by taping the centre box. Then push the small bow-tie-shaped ends in towards the box, forming the ends "ruffles".  (Like on right side)

5. Slip in snaps inside the cracker with ends sticking out. Glue to inside of "ruffles" so that they pull apart when the cracker is pulled. (I purchased cracker snaps from the big box craftstore.)
6. Insert little items - tissue-paper crowns, a riddle or joke, candy, and a little toy or other small gift. (Purchased at the dollar store) 

7. Tie the ends together with ribbon. Any ribbon will do. (here i used shimmer trim, see below where plain gift wrapping ribbon was used.)

8. Add a tag with a holiday wish.

Last year we used crackers instead of place cards. Simply personalize each cracker according to each person's interests. Elegant snowflakes for Mamie, sweets for Grandpa, santa for Mom and trees for Dad, ornaments for the kids.


*********
Thank you so much for following along on our Blog Hop today! I hope you enjoyed all the lovely artwork. Now it’s time to head on over to Pam's blog and see her project! Be sure to visit all the Consultants at their Blogs to get some great crafting ideas!

And don't forget
Friends don't let friends craft alone.

à bientôt,
Dominique

Monday, 26 October 2015

14 hour Christmas Crop - Saturday November 21

Come crop til you drop from 9:30AM to 11:30PM ! This bilingual event is open to all crafters! 

Day Includes la Journée Inclus
• 8 feet of cropping space / 8 pieds d'espace de travail
• Free Goodie Bag / sac-cadeau gratuit
• 14 hours to focus on your crafting / 14 heures de crop 
• Challenge, Games and Prizes. (must be present to win) / Défijeux et des prix 
• Shopping (scrapbooking supplies available). / Magasinage (des fournitures seront disponible) 
• Free Wi-Fi / WiFi gratuit
• Free parking and easy access - no stairs. / Sationnement gratuit et facile d'accès - aucun escalier
• Fun and laughter / du plaisir autant que vous en voulez!!!

Optional / Supplémentaire
• Meals/ Repas:

            Lunch: Salad, pop, pizza / salade, boisson, pizza (1 slice/pointe= $5 or/ou 2 slices/pointes= $9)
            Dinner $10 (salad, roll, chili with toppings, dessert) / Souper 10 $(salade, petit pain, chili et                     accompagnements, dessert)
• Christmas-themed  Workshops / Ateliers à thématique de Noël:  
           Cards:  $12  Make a set of 10 cards in less than 60min (envelopes included).  Faites un                                        ensemble de 10 cartes en une heure (enveloppes inclus)
           Scrapbooking: A double and a single layouts $15 (or $20: keep a full set of embellishments)
                         Sneak peek below. / Double pages de scrap et une simple pour 15 $ (ou 20 $ sans                                partager les embellissements)

PRICING / COÛT
$35 + meals + workshops / 35 $ + repas + ateliers

PAYMENT OPTIONS / PAIEMENT
• E-transfer payment / transfert bancaire
• Cash / comptant

TABLES
Get a full 8-foot table all to yourself. Lots of Room!! Dedicated tables will be set up near power outlets for Cricut/Silhouettes, etc. 
Une table de 8 pieds par croppineuse. Des tables seront installées près des prises de courant pour les appareils Cricut/Silhouettes. 

MEALS / REPAS
 Pizza served at lunch will be from famous Louis restaurant. Dinner will be salad, roll, chili with toppings, dessert. Bar will open at noon. We do not have access to a fridge, microwave or kitchen. /
Les pointes de pizza pour le lunch proviennent de chez Louis.  Souper (salade, petit pain, chili et accompagnements, dessert) Le bar sera ouvert à midi. Il n’y a pas de cuisine, ni frigo ou micro-ondes. 
WORKSHOPS / ATELIERS
Sign up for one or both. Card workshop taught by Dominique Groulx and layouts taught by Sue Mallory.
Prenez-en un, ou tous les deux. L'ateliers de cartes offert par Dominique Groulx et les pages de scrapbooking par Sue Mallory. 

REGISTER by November 1/ INSCRIPTION d’ici le 1er novembre 2015
Cost is $35 + meals + workshops. Return the registration form with your payment to guarantee your spot. Space is limited. Sorry, no refundshowever your spot can be transferred to a friend - just let us know. 
Coût: 35 $ + repas + ateliers. Veuillez retourner le formulaire d’inscription avec votre paiement le plus tôt possible afin de réservez votre place. Désolé, aucun remboursement ne sera accordé, par contre, votre place peut être transférée à une autre – dites-nous le dès que possible.  

FOR MORE INFORMATION / POUR PLUS D'INFO
Contact me at dominique.fun2cre8@gmail.com


And don't forget
Friends don't let friends craft alone.

à bientôt,
Dominique

Saturday, 6 December 2014

Everything ABC's Blog Hop - Y

Welcome to the Everything ABC's Blog Hop!

For this hop we are featuring the letter Y. This may be the name of a paper, a stamp set, an embellishment or a style. Whatever the crafter has chosen as their Y element will be featured in their post.

If you came from the talented Diana Saunders at FarmerDi then you're on the right track!
___________________

For the letter Y, I decided to use both the Yuletide paper (X7187B) and the Yuletide Greetings stamp set (D1553) from Close to My Heart .

In the paper pack is this one sheet that just screamed to be used on Christmas cards. Here is how I divided it up.

You can easily make 10 unique card fronts from this one sheet. I chose to make 9 using little to no embellishments to let the paper speak for itself - just a sentiment and some ink. Below you will find four cards.

Card #1
Stockings hung by the chimney with care
In the card above, I used New England Ivy green cardstock to mat the pattern paper and adhered them to the CTMH card base in Colonial, the creaminess adds to the vintage feel. There was just enough space at the top to stamp the sentiment Yuletide Greetings from the gorgeous stamp set.

Card #2
Deck the Halls
 In the card above, I used Ruby red cardstock to mat the pattern paper and adhered them to the CTMH card base in Colonial. And at the top stamped Deck the Halls - another sentiment from the Yuletide Greetings stamp set.

Card #3

 In the card above, I used New England Ivy cardstock to mat the pattern paper and adhered them to the CTMH card base in Colonial. I distressed the card with ruby ink, and added 2 little sparkles (Z1752).

TIP
You can colour clear bling, using the ShinHan alcohol based markers. Here I used the colour Carmine (Z2448) for the perfect shade of red.

Card #4

In the card above, I used Ruby red cardstock to mat the pattern paper and adhered them to the CTMH card base in Colonial. And at the bottom I stamped the sentiment - this one came from the versatile Holiday Tag stamp set (D1560).
___________________

Thank you so much for following along on our Blog Hop today! I hope you enjoyed all the lovely artwork…
I love getting your comments and feedback. Be sure to leave a comment below before you move on in the hop!

Your next stop on our Everything ABC'S blog Hop is Lauren Moore of CTMH Craftings. Be sure to visit all the Consultants at their Blogs to get some great crafting ideas! And please leave comments for the other bloggers as you hop through! In case you get lost along the way, go to Linda's blog ~ Scrappy Therapy for a complete list of participants!


And don't forget
Friends don't let friends craft alone.

à bientôt,
Dominique

Wednesday, 19 November 2014

Make It Crafty Seasonal Blog Hop - Christmas Creation

Welcome to the •MAKE•IT•Crafty• Seasonal Blog Hop!  This month we will be featuring Christmas and Winter creations.
If you’ve arrive from Lisa at Prettypaperiesweets, you are on the right path! The blog hop is a great big circle, so you can start here and work your way around.  If you get lost, you’ll find the complete list of participating consultants here.

This month we have a number of Close To My Heart Consultants from Ottawa sharing their creations using various CTMH products to help you get in a festive mood for the holidays.
______________________________________________

At this time of year, everyone's "To Do" list seems to get longer and longer, so here is a quick and easy card so you can get back to all those other things like decorating, baking and spending time with loved ones.
O Tannenbaum Christmas Tree - card by fun2cre8.blogspot.ca
O Tannenbaum - Mon Beau Sapin

To create the wood texture on the green cardstock, I used a stamp from the Pathfinding cardmaking WOTG kit with New England Ivy ink. I also used that ink to stamp the image of the Christmas tree. I added some Glitter Gel to make it sparkle.

TIP
You can also use CTMH's woodgrain embossing folder (Z1996) to create the wood texture.
Cut the gold shimmer trim in 2 smaller pieces - no point in wasting what you can see behind the tree...

Supplies
Card base and envelope in Daisy white  (X254)
Cardstock: Ruby red, New England Ivy green and Daisy White
Shimmer Trim: Gold (Z1985)
Ink: Archival Black (44571), New England Ivy green
Tree image: Always Grateful stamp (C1559)
Sentiment: Perfect Fit -Holidays stamp (B1412)
Wood texture: Pathfinding cardmaking WOTG kit (G1083) 

_____________________________________________
Thank you so much for following along on our Blog Hop today! I hope you enjoyed all the lovely artwork… Now it’s time to head on over to  Wendy's blog at DoddsyDesigns and see her artwork! Be sure to visit all the Consultants at their Blogs to get some great crafting ideas! And please leave comments for the other bloggers as you hop through!

Look for our next Blog Hop where we will feature beautiful Valentines projects, à bientôt!

Dominique
Saturday, 11 October 2014

Cut Above and Designer Creations

CTMH launched two new lines in their Annual Inspirations 2014; the Cut Above and the Designer Creations.

Cut Above
this line carries card and treat bag kits for quick crafting. All pieces of the kit are pre-cut and ready to be assembled. Coordinating stamp images designed especially for these kits fit perfectly on the die-cut pieces and can be stamped in a single color of ink.

The treat bag kits come in 2 themes, Halloween and Christmas and contain printed treat bags, stickers, pre-cut cardstock circles, 3-D foam squares, and cellophane bags


The card kits come in 4 themes (birthday, thank you and Christmas) and contain various mixes of card bases, envelopes, 3-D foam squares, die-cut shapes, stickers, printed pieces, and embellishments. 


Designer Creations This line carries 3-D items in fun colors and patterns such as boxes and bags meant to hold your handmade art, photos, or other treats. 
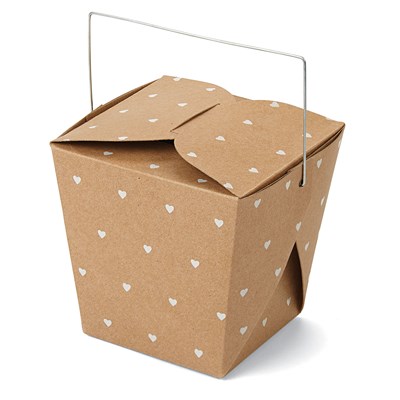
The kraft paper takeout  boxes with metal wire handle folds into a cute gift box. Comes in pack of 2. It is 4" tall and tapers from 4" square top to 3" square bottom. 

 
The buttoned bag can be fastened shut, making storage convenient.Comes in pack of 2.  The slate bags are 7" × 4½" with foldable top.

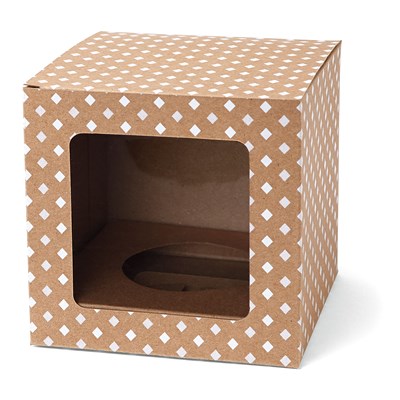
The cupcake box includes a round base—just the right size for a cupcake—and a viewing window. Comes in pack of 2.


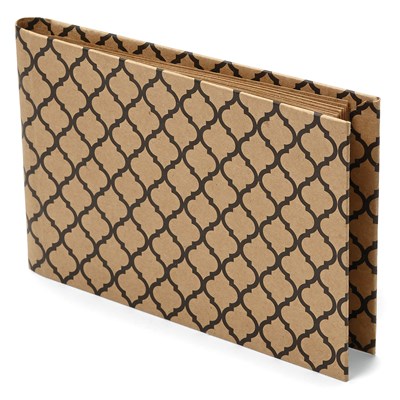
The 5" × 7" album are ideal for holding photos and other paper pieces and embellishments. Contains 10 kraft pages; kraft printed hardcover and is wire-bound.


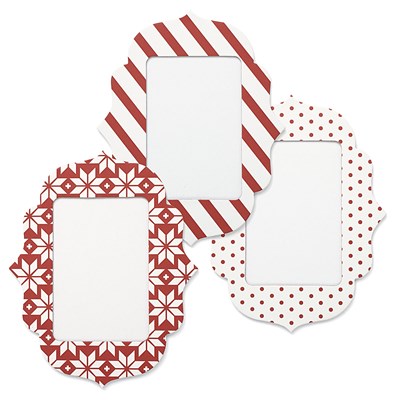
The 5" × 4" mini chipboard frames come in pack of 3, Ruby. Fit 2" × 3" photos.


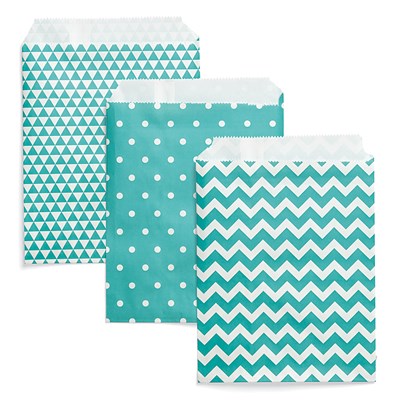
The paper bags come in several different designs and 4 colours, Lagoon, Honey, Ruby and Slate.